
***
I'm not exactly sure what this garment is meant to be...A gown? A kirtle?


The inspiration came from the Trevelyon Miscellany of 1608, a collection of images appropriated and later redrawn and coloured by Thomas Trevelyon.


I fell in love with this image immediately.
It appears to be a single front lacing layer worn over an exposed smock, paired with an apron and a linen partlet with attached or integral ruff.
Now, it's never a good idea to take coloured drawings at face value and it's clear that some liberties have been taken with the image when compared to the original, a Dutch engraving from the 1590s.
 |
| Jacob de Gheyn, 1593-97 |
Leaving to one side whether or not blue and green were popular colour choices, some fairly glaring differences include the fact that the white linen cap has been turned into a black hood and the overpartlet (probably black and worn over a separate ruff and collar) has been turned into a single linen piece.

However, despite the inconsistencies, I still thought it would be fun to reproduce the image as interpreted by Trevelyon.
As a starting point I decided to use the late period bodice pattern from The Tudor Tailor, but I knew the most challenging aspect fo the outfit would be the sleeves.
First I tried a single piece sleeve pattern since the inspiration images don't seem to show front seams. The sleeve pattern for the late period gown is quite large, so I make a narrower one using the two piece sleeve from the Tudor Tailor women's doublet.

Not bad a terrible start, but the bodice need adjusting the sleeves still have too much volume.

Next I widen the neckline and try a narrower single piece sleeve and a two piece sleeve with extra volume in the sleeve head.

Better, but I'm still worried there's odd tension through the neck and so I think about tweaking the angle for the neckline.


Option B appears to be the closest (especially when worn with a partlet). And while I'm not totally in love with the shape it's not too dissimilar to other Dutch styles from the 1570s.


With the mockup done it's time to start the gown in earnest.
And since the inspiration is somewhat historically compromised I decide to apply the same approach to the construction!
For a while I've wanted a complete outfit that I could wear to Faire that didn't require any additional support layers (for days that the weather was to hot or I too lazy). So be prepared for a lot of very non-historical theatrical cheats.
First off, I went back to boning.
I'd abandoned bones on my red and tan petticoat bodies to some initial success. However, I later realized that the linen canvas I had chosen was very prone to stretching and that compromised the comfort and fit of the bodice.
I'd used the same linen canvas on the early stages of this project, and you can see that even after stabilizing with pad stitching the piece had grown by about 1/2".

Now, I know that's no excuse, especially given the obviously creased and natural fit of the gown in the original engraving.
I also know in my historical heart that I should transition to the more tailored method popularized by the amazing Mathew Gnagy in the Modern Maker book series.
But the truth is I'm used to boning. I know how to make it work...and given a new job, killer commute and limited sewing time I wanted to make something relatively quickly and easily (which I could be reasonably sure I'd get right the first time round).
So I cheat.
However, I use much less boning than usual; with spring steel along the lacing edge and just a few lengths of 7mm synthetic whalebone through the front of the bodice.


The foundation layers are constructed in the same way as my other kirtles, which is to say two moderately heavy layers of hemp/cotton fabric (10.5 oz) pad stitched together with channels sewn in for additional quilting. Again, not saying its right, it's just what I'm used to.
Then the bones are inserted.
However, at the last minute I decided I needed an extra layer of interlining just to be safe. So to the above pieces I added a third layer of lighter hemp/cotton twill (5.7oz), pad stitching it down and added a couple of additional rows of stitches.

Then the outer wool shell is temporarily pad stitched to the foundation layers, so that everything stays lined up and the tension even throughout the construction process.
I feel like this is might be quite a lot of unnecessary work. I'm sure a basting stitch would work just as well but I feel like I can get an even tautness with pad stitching, which I hope makes for a smoother final bodice later.
Also, I leave quite a large seam allowance along the front edge since I want to fold this back to create extra padding along the front edge where the spring steel is.

Then all the seams (except for the shoulder seams) are stitched together.
First they are anchored down with wide Holbein stitch along the seam guide I had previously stitched into the foundation layers. The seam is then reenforced with a back stitch. This process is poorly documented, but due to time constraints I din't take may photos along the way...but look back to my past kirtle posts for more in depth steps.

Before tacking down the seam allowances I snip out the extra layer of 5.7oz interlining, to reduce bulk at the seams.

Then all the seam allowances are clipped and stitched down (except around the back collar and shoulder seams)


Then the lining is made up in medium weight blue linen and pinned into place...

...and stitched down (again, the shoulders and collar are pinned in for now but won't be stitched until later).


Then a temporary lacing strips are added and the bodice tried on for fit.

Looks good!
You can see there's a larger gap down the centre front compared to the mockup. This is largely due to the fact that the bodice (with is multiple internal layers) has much less give than the muslin. However, during construction I also took in the centre front but an additional 1/2" on either side to more closely approximate the gap in the original etching.
With the fit checked the shoulder seams are now reenforced with a backstitch and, as with the body pieces, the 5.7oz lingering is snipped away.


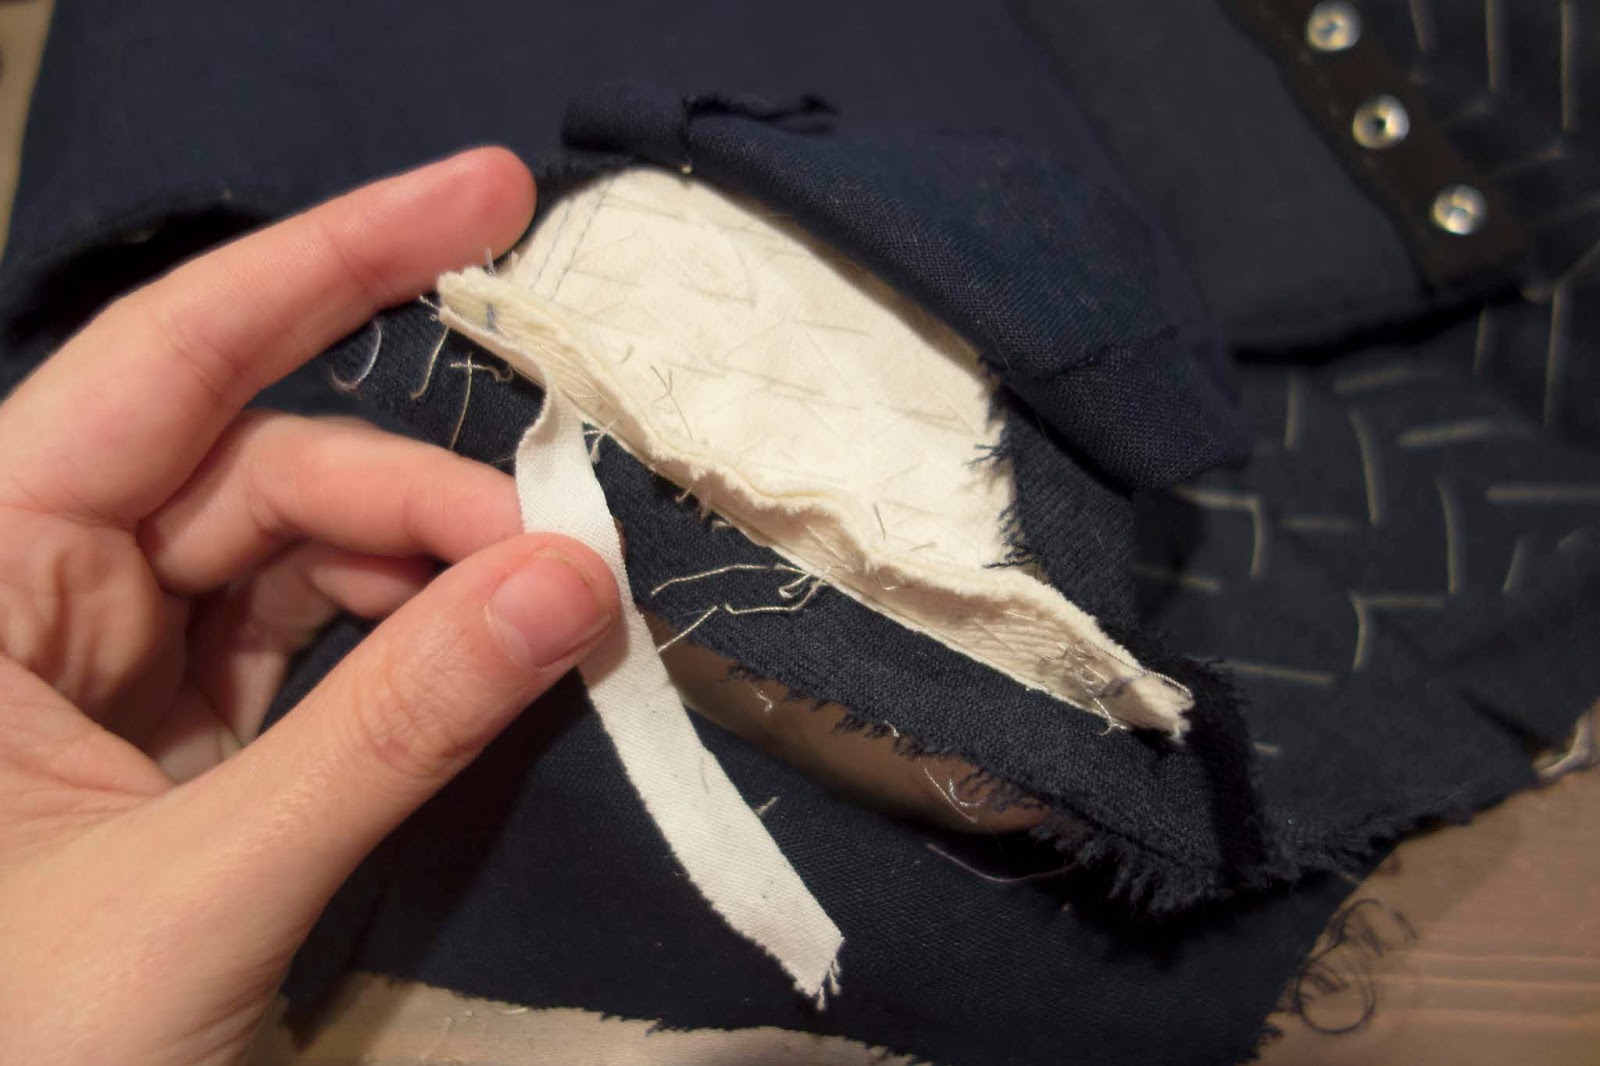

The corners of the shoulder seams are stitched together to create a more even curve. Since the finished sleeve will be whipstitched to the completed armscye eliminating gaps will be important.

Then the lining is stitched down at the shoulder. In order to reduce bulk on the seam itself, the front piece is stitched down flat towards the back of the bodice.


Finally, the lining around the collar is stitched down.

With the bodice assembled it's time to make up the lacing strips.
The strips are constructed of a length of linen, folded over twice (so four layers deep altogether) that is stitched along the outer edges.
Then holes are poked with an awl and the eyelets worked with a buttonhole stitch.


The eyelets are offset for spiral lacing.


Before the strips are sewn into the bodice, the wool on the inside of the bodice is stitched down into the empty channel between the two spring steel bones. Normally I'd say be careful not to catch the fabric on outside, but it was so difficult to sew between the bones that I was lucky if I even caught two of the interlining layers.


Then the strips are stitched down, first with a spaced backstitch 1/8" away from the inside edge and then with a whip stitch. Again, it was very difficult to sew around the bones so the result basically looks like the dog's breakfast.

After both stripes are secured the bodice is tried on again.


Looks pretty straight!
However, aesthetically I think there may be too many rows of lacing, so I may experiment with only lacing every other eyelet.
Now the temporary pad stitches are removed from the exterior of the bodice it's time to attach the sleeves.
The sleeves are made up separately and completely finished along all edges.
(I neglected to document it, but there is additional layer of wool pad stitched to the lining of the top of the sleeve head. Im hoping this will give the pleats a bit more "oomph" and help them stand away from the body.)


I didn't document this part of the process at all having gone over it pretty throughly in my petticoat bodies post. I followed the same process for levelling and cartridge pleating the skirt, the only difference is the this time I lined it in linen. Maybe "lined" is not the correct term, because I left it free falling at the bottom. In addition, 4 stripes of worsted wool tape are sewn in around the bottom to give the skirt a little more body, so really it's more of a built in petticoat.


First, the parlet.
I actually ended up making two. The first was made in a light/medium weight linen (4.5oz) with integral ruffle in a finer 2.8oz linen.

It was perfectly nice, but I didn't love all my choices.
I had originally wanted a thicker, more opaque linen to fully conceal the neckline of the gown (as in the original) but I think the seams and hemmed edges look too substantial as a result.


And of course after looking at the original again the ruff is too regular and set to be passed off as a ruffle.
So I decide to make a second version, this time in lighter 2.8oz linen with a narrow 1/8" hems all around and a single felled seam at the shoulder. I also leave the ruffle off so I can pin my small ruff to it later.


Likely other aprons it's a large rectangle, whipstitched to a waistband (leaving the ends loose). However, in keeping with my other theatrical cheats, I add a small tuck on either side to coax it into the folds seen in the engraving.

Lastly, a coif.
I've never made a coif before (having purchased all of mine up to this point) so of course I end up choosing an atypical pattern to start with. Most extant examples have the seam at the centre top, but since the inspiration image does not I decide to try my hand at a "Manchester" coif (based on on extend example from the early 17th century) with a seam down the centre back instead.
First the pattern is cut in lightweight linen and hemmed all the way around.

Then the back seam is whipstitched together and a lacing channel turned and sewn down.

The final result has a very 17th century silhouette, but I'm hoping I can mitigate that by starching the front and shaping it over ear irons.


And finally, just a few more accessories to finish the look...


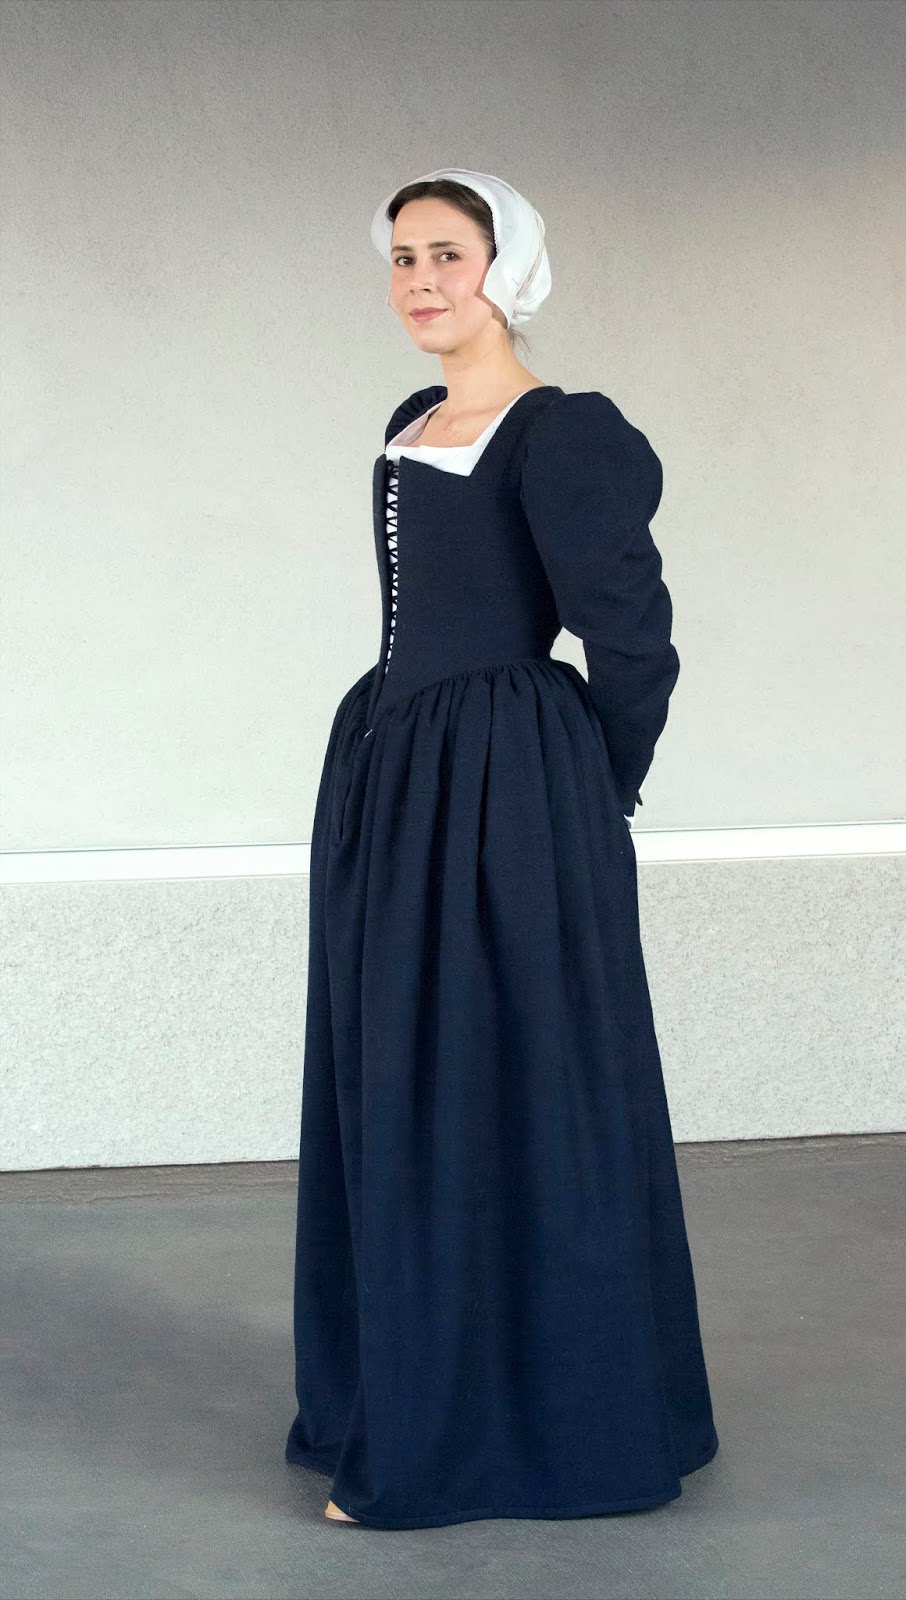
And that's it! The Trevelyon gown/kirtle-thingy is done!

And ended up reasonably close to the inspiration image...


The sleeves are too tight and needed to be opened up at the wrist by about an inch...and even so remain a bit snug. However, the good thing about whip stitching a finished sleeve into the armscye is that it's very easy to swap out later if it really bugs me.
As you can see the skirt is far too long. I'd measured it in a shoes with a higher heel, but even taking that into consideration the front could still stand to be shortened by at least 1/2".
Finally, the top of the bust is too high and comes to too much of a point...and as usual, my coif is migrating towards the back of my head (since I don't have enough hair to do proper hair taping).
But apart from all that I think it turned out okay!




***
Resources & Materials
Pattern:
-The Tudor Tailor (book and/or ready-made pattern)
-The Marquess of Winchester Coif #4
Fabric:
-Blue worsted wool from B.Blacks & Sons
-Dark blue linen from B.Blacks & Sons
-Green "Vineyard" linen (7.1oz) from Fabric-Store.com
-White linen (2.8oz) from WM Booth Draper
-White "Barry" linen (4.5 oz) Gray Line Linen
-Hemp/cotton muslin for interlining (10.5) from Hemp Traders
-Muslin for mockup (also from Hemp Traders, but any muslin should do)
Trim and Notions:
-Dark Blue Worsted Wool tape (7/8") from WM Booth Draper
-Linen tape (1/4") from WM Booth Draper
Thread:
-Black silk thread
-Blue silk thread
-Black buttonhole thread
-Green cotton thread
-White cotton thread (silk finish) for coif and partlets
Boning:
-7mm Plastic coated spring steel bones (4) from Vena Cava Design
-5mm Synthetic whalebone also from Vena Cava Design
Other Supplies:
-Swedish pattern paper from Amazon. (This stuff is great! You can iron it!)
-Pattern weights
-Eyelet tape (for mockup)


